All the JavaScript you need to know before starting with React
- Block scopes and the var/let/const keywords
- Arrow functions and closures
- The literal notations
- Expressions for React
- Destructuring arrays and objects
- The rest/spread syntax
- Shorthand and dynamic properties
- Promises and async/await
- Modules import/export
- Map, filter, and reduce
- Conditional expressions
- Timeouts and intervals
React developers love the modern features in JavaScript and use them extensively in their projects. In this guide, I’ll go over the most popular features that are usually used with React. Most of these features are modern to JavaScript but I’ll also talk about some older ones that are related and important for React.
This will NOT be a complete list of everything offered by the JavaScript language but rather the subset that I think will help you write better code for React.
Block scopes and the var/let/const keywords
A block scope is created with a pair of curly brackets. This happens every time you create an if-statement, for-statement, while-statement, etc. The only exception is the curly brackets you use with functions. These create a function scope, not a block scope.
{
// Block Scope
}
if (true) {
// Block Scope
}
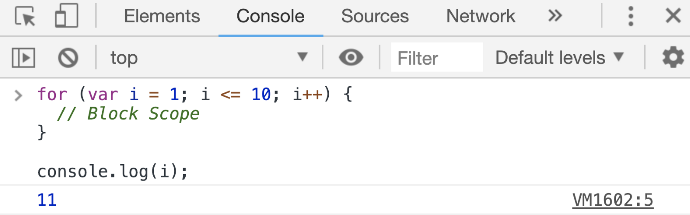
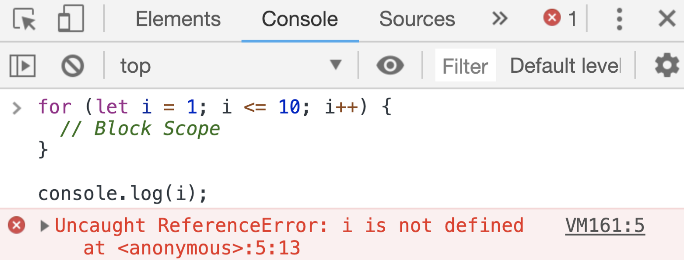
for (var i = 1; i <= 10; i++) {
// Block Scope
}
function doSomething() {
// Function Scope
}
Function scopes are created for each function (like doSomething above). One difference they have from block scopes is obvious when using the var keyword. Variables defined with var inside a function scope are okay; they don’t leak out of that scope. If you try to access them outside of the scope, you can’t:
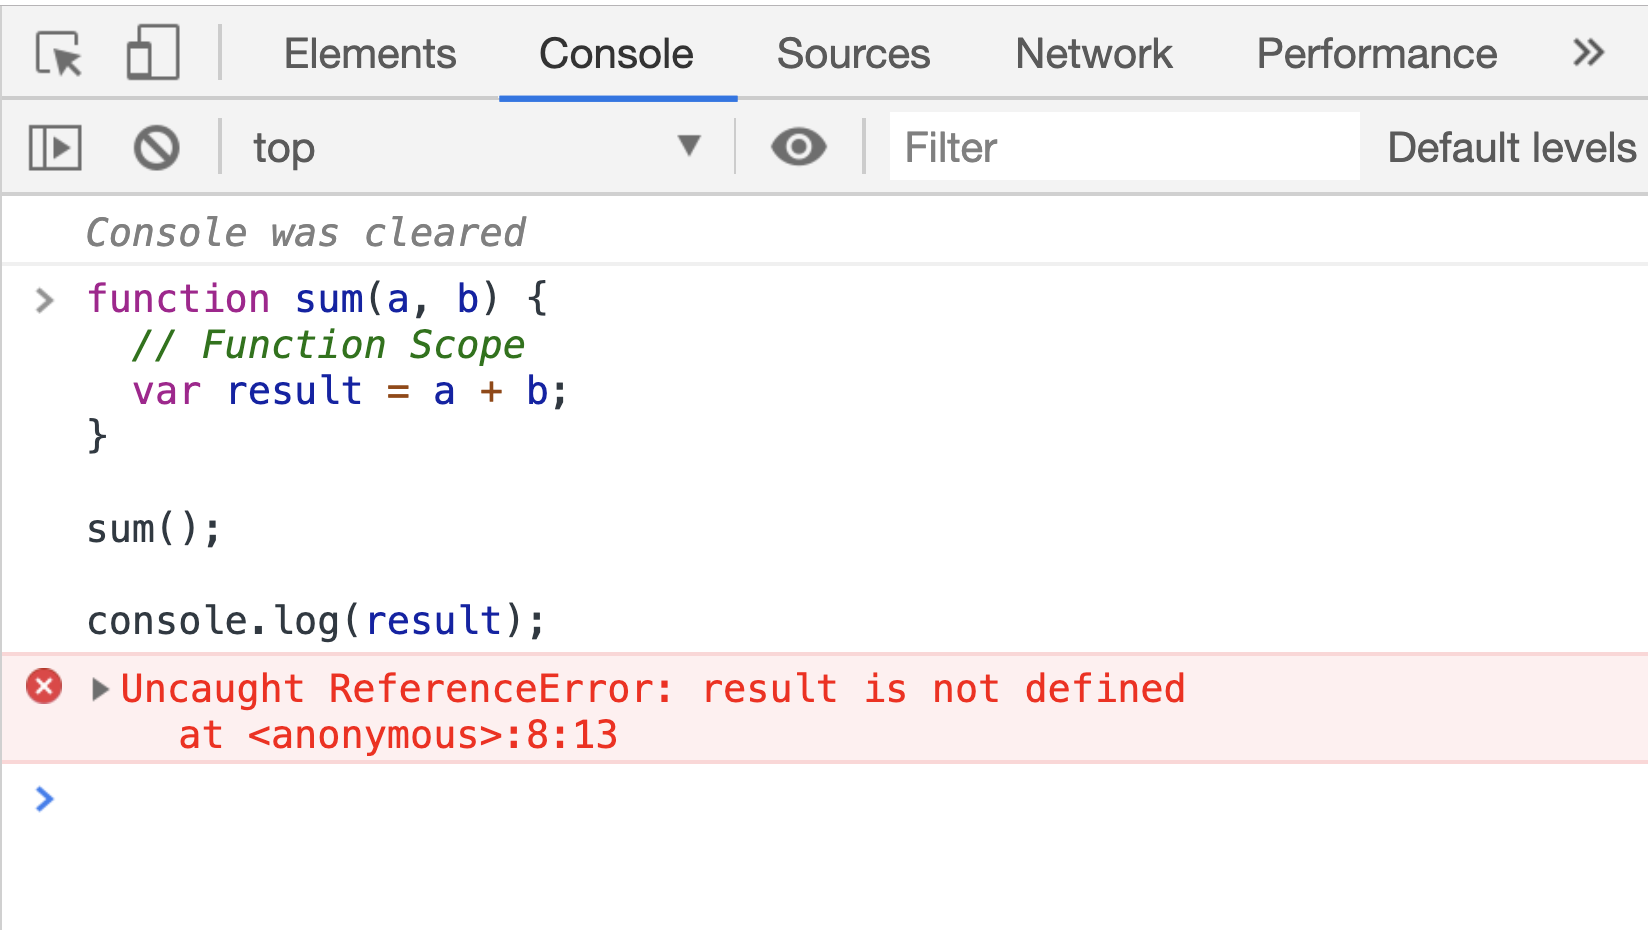
However, when you define variables with var in a block scope you can totally access them outside that scope afterward, which is a bit problematic. For example, in a standard for-loop statement, if the loop variable is defined with var you can access that variable after the loop is done.
This is why the more recommended way to declare variables in modern JavaScript is by using the let keyword instead of the var keyword. When defining variables with let, we won’t have this weird out-of-scope access problem.
However, you should use the let keyword only when the variable’s value needs to be changed. This should not be a common thing in your code. For most other cases you should use the const keyword instead, so let me tell you about it.
In JavaScript, a variable is basically a label we put on a certain space in the computer’s memory.
let V = { id: 42 }; // create a memory unit and label it as V
When you change the value of the variable V you are not really changing the content of the memory space that was initially associated with V. Instead, you’re creating a new memory space and changing the V label to be associated with that new space.
// Discard current memory unit (and its current label)
// Create new memory unit and label it as V

V = []; // No errors
When you use const to define a variable, you are instructing the computer to not only label a space in memory but to also never change that label. The label will be forever associated with its same space in memory.
// Create a memory unit and label it as V
// This label cannot be discarded or reused
const V = { id: 42 };

// Later in the program
V = []; // TypeError: Assignment to constant variable.
Note that the constant part here is just the label. The value of what’s in the memory space can still change (if it’s mutable). For example, objects in JavaScript are mutable, so for the V above:
// You can do:
V.id = 37; // No errors

console.log(V.id); // 37

// But you still can't do:
V = { id: 37 }; // TypeError: Assignment to constant variable.
This applies to arrays too (because they are mutable as well).
Strings and Integers are immutable in JavaScript so the only way to change a string or integer value in JavaScript is to discard current memory space and re-label another one. That’s why if you have a numeric counter that you need to increment in your program you would need to use let:
// Can't use const for this case:
let counter = 0;

counter = counter + 1; // Discard and re-label
Arrow functions and closures
Arrow functions are probably the most used feature in Modern JavaScript.
Here’s what they look like:
const doSomething = () => {
  // Function Scope
};
This new "shorter" syntax to define functions is popular not only because it’s shorter but also because it behaves more predictably with closures. Arrow functions give access to their defining environment while regular functions give access to their calling environment. This access is possible through the special this keyword in a function’s scope:
-
The value of the
thiskeyword inside a regular function depends on how the function was called. -
The value of the
thiskeyword inside an arrow function depends on where the function was defined.
Here is a code example to expand on the explanation. Try to figure out what will be printed in Output #1 through #4 (last 4 lines):
// jsdrops.com/arrow-functions

this.whoIsThis = 'TOP'; // Identify this scope

// 1) Defining
const fancyObj {
  whoIsThis: 'FANCY', // Identify this object
  regularF: function () {
    console.log('regularF', this.whoIsThis);
  },
  arrowF: () => {
    console.log('arrowF', this.whoIsThis);
  },
};

// 2) Calling
console.log('TOP-LEVEL', this.whoIsThis); // It's "TOP" here

fancyObj.regularF(); // Output #1 (Fancy)
fancyObj.arrowF();   // Output #2 (Top)

fancyObj.regularF.call({whoIsThis: 'FAKE'}); // Output #3 (Fake)
fancyObj.arrowF.call({whoIsThis: 'FAKE'});   // Output #4 (Top)
This example has a regular function (regularF) and an arrow function (arrowF) defined in the same environment and called by the same caller. Here’s the explanation of the outputs in the last 4 lines:
-
The regular function will always use its
thisto represent who called it. In the example above, the caller of both functions was thefancyObjitself. That’s why Output #1 was "FANCY". -
The arrow function will always print the
thisscope that was available at the time it was defined. That’s why Output #2 was "TOP". -
The functions
.call,.apply, and.bindcan be used to change the calling environment. Their first argument becomes the new "caller". That’s why Output #3 was "FAKE". -
The arrow function does not care about the
.callcaller change. That’s why Output #4 was "TOP" and not the new "FAKE" caller.
One other cool thing about arrow functions is that if the function only has a single return line:
const square = (a) => {
  return a * a;
};
You can make it even more concise by removing the curly brackets and the return keyword altogether.
const square = (a) => a * a;
You can also remove the parentheses around the argument if the function receives a single argument:
const square = a => a * a;
This much shorter syntax is usually popular for functions that get passed to array methods like map, reduce, filter, and other functional programming methods:
console.log([1, 2, 3, 4].map(a => a * a));
Note that if you want to use the arrow-function one-liner version to make a function that returns an object you’ll have to enclose the object in parenthesis because otherwise the curly brackets will actually be for the scope of the function.
// Wrong
const objMaker = () => { answer: 42 };

// Right
const objMaker = () => ({ answer: 42 });
The above is actually one of the most common mistakes beginners do when working with libraries like React.
The literal notations
You can create a JavaScript object in a few different ways but the most common way is with an object literal (using curly brackets):
const obj = {
  // key: value
};
This literal notation (AKA initializer notation) is very common. We use it for objects, arrays, strings, numbers, and even things like regular expressions!
For arrays, the literal syntax is to use a set of square brackets []:
const arr = [item0, item1, item2, ...];
For strings, you can use either single quotes or double quotes:
const greeting = "Hello World";
const answer = 'Forty Two';
These 2 ways to define string literals in JavaScript are equivalent. Modern JavaScript has a third way to define strings and that’s using the backtick character.
const html = `
  <div>
    ${Math.random()}
  </div>
`;
Paste that in your browser’s console and see how it forms a multiline string that has a random value:

Strings defined with the backtick character are called template strings because they can be used as a template with dynamic values. They support string interpolation. You can inject any JavaScript expression within the ${} syntax.
With template strings you can also have multiple lines in the string, something that was not possible with the regular-quoted strings. You can also "tag" templates strings with a function and have JavaScript execute that function before returning the string, which is a handy way to attach logic to strings. This tagging feature is used in the popular styled-components library (for React).
| Backticks look very similar to single quotes. Make sure to train your eyes to spot template strings when they are used. |
Expressions for React
In React, there is a syntax similar to the template literal syntax that you can use to dynamically insert a JavaScript expression into your React components' code. It looks like this:
// Somewhere in a React component's return value

<div>
  {Math.random()}
</div>
This is NOT a JavaScript template literal. These curly brackets in React are how you can insert dynamic expressions in JSX. You don’t use a $ sign with them. Although, you can still use JavaScript template strings elsewhere in a React application (including anywhere within JSX curly brackets). This might be confusing so here’s an example that uses both JSX curly brackets and JavaScript template literals curly brackets in the same line:
<div>
  {`Random value is: ${Math.random()}`}
</div>
The bolded part is the JavaScript template literal, which is an expression. We’re evaluating that expression within JSX curly brackets.
Destructuring arrays and objects
The destructuring syntax is simple but it makes use of the same curly and square brackets you use with object/array literals, which makes it confusing sometimes. You need to inspect the context to know whether a set of curly brackets ({}) or square brackets ([]) are used as literal initializing or destructuring assignment.
const PI = Math.PI;
console.log({ PI });
const fn = ({ PI }) => {}
In Code Listing 3.9, the first { PI } (in the second line) is an object literal which uses the PI constant defined in the first line. The second { PI } (in the last line) is a destructuring assignment that has nothing to do with the PI variable defined in the first line.
It can really get a lot more confusing than that, but here is a simple general rule to identify what’s what:
When brackets appear on the left-hand side (LHS) of an assignment or within the parenthesis used to define a function they are most-likely used for destructuring. There are exceptions to this rule but these exceptions are rare.
Example of destructuring:
// 1) Destructure array items
const [first, second,, fourth] = [10, 20, 30, 40];

// 2) Destructure object properties
const { PI, E, SQRT2 } = Math;
These are both destructing because the brackets are on the LHS of the assignment.
Destructuring simply extracts named items out of an array (using their position) or properties out of an object (using their names) and into local variables in the enclosing scope. The 2 lines above are equivalent to:
// 1) assuming arr is [10, 20, 30, 40]
const first = arr[0];
const second = arr[1];
// third element skipped
const fourth = arr[3];

// 2)
const PI = Math.PI;
const E = Math.E;
const SQRT2 = Math.SQRT2;
This is useful when you need to use a few properties out of a bigger object. For example, here’s a line to destructure the useState and useEffect hook functions out of the React’s API.
const { useState, useEffect } = React;
After this line, you can use these React API objects directly:
const [state, setState] = useState();

useEffect(() => {
  // do something
});
Note how the 2 items in the useState function’s return value (which is an array of exactly 2 items) were also destructured into 2 local variables.
When designing a function to receive objects and arrays as arguments, you can use destructuring as well to extract named items or properties out of them and into local variables in the function’s scope. Here’s an example:
const circle = {
  label: 'circleX',
  radius: 2,
};

const circleArea = ({ radius }, [precision = 2]) =>
  (Math.PI * radius * radius).toFixed(precision);

console.log(
  circleArea(circle, [5]) // 12.56637
);
The circleArea function is designed to receive an object in its first argument and an array in its second argument. These arguments are not named and not used directly in the function’s scope. Instead, their properties and items are destructured and used in the function’s scope. You can even give destructured element default values (as it’s done for the precision item).
In JavaScript, using destructuring with a single object as the argument of a function is an alternative to named arguments (which is available in other languages). It is much better than relying on positional arguments.
The rest/spread syntax
Destructuring gets more interesting (and useful) when combined with the rest syntax and the spread syntax, which are both done using the 3 dots (...) syntax. However, they do different things.
The rest syntax is what you use with destructuring. The spread syntax is what you use in object/array literals.
Here’s an example:
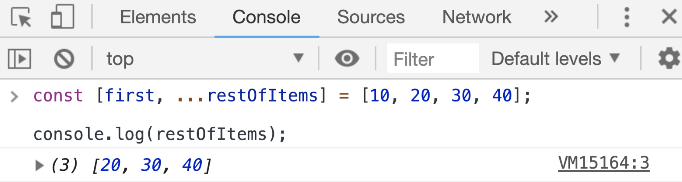
const [first, ...restOfItems] = [10, 20, 30, 40];
The 3-dots here, because they are in a destructuring call, represent a rest syntax. We are asking JavaScript here to destructure only 1 item out of this array (the first one) and then create a new array under the name restOfItems to hold the rest of the items (after removing the first one).
This is powerful for splitting the array and it’s even more powerful when working with objects to filter out certain properties from an object. For example, given this object:
const obj1 = {
  temp1: '001',
  temp2: '002',
  firstName: 'John',
  lastName: 'Doe',
  // many other properties
};
If you need to create a new object that has all the properties of obj1 except for temp1 and temp2, what would you do?
You can simply destructure temp1 and temp2 (and ignore them) and then use the rest syntax to capture the remaining properties into a new object:
const { temp1, temp2, ...obj2 } = obj1;
How cool is that?
The spread syntax uses the same 3-dots to shallow-copy an array or an object into a new array or an object. This is commonly used to merge partial data structures into existing ones. It replaces the need to use the Object.assign method.
const array2 = [newItem0, ...array1, newItem1, newItem2];
const object2 = {
  ...object1,
  newP1: 1,
  newP2: 2,
};
| When using the spread syntax with objects a property-name conflict will resolve to taking the value of the last property. |
In React, the same 3-dots are used to spread an object of "props" for a component call. The JavaScript spread syntax was inspired by React (and others), but the usage of the 3-dots in React/JSX and in JavaScript is a little bit different. For example, given that a component X has access to an object like:
const engine = { href: "http://google.com", src: "google.png" };
That component can render another component Y and spread the properties of the engine object as props (attributes) for Y:
<Y {...engine} />
This is equivalent to doing:
<Y href={engine.href} src={engine.src} />
Note that the curly brackets above are the JSX curly brackets.
Shorthand and dynamic properties
Here are a few things you can do with object literals in modern JavaScript:
const mystery = 'answer';
const InverseOfPI = 1 / Math.PI;

const obj = {
  p1: 10,        // Plain old object property (don't abbreviate)

  f1() {},       // Define a shorthand function property

  InverseOfPI,   // Define a shorthand regular property

  f2: () => {},  // Define an arrow function property

  [mystery]: 42, // Define a dynamic property
};
Did you notice that [mystery] thing? That is NOT an array or a destructuring thing. It is how you define a dynamic property.
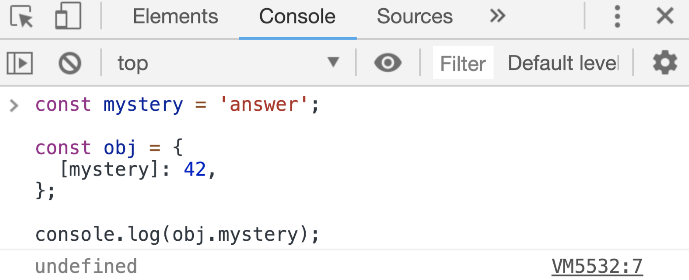
When you use the dynamic property syntax, JavaScript will first evaluate the expression inside [] and whatever that expression evaluates to becomes the object’s new property.
For the example above, the obj object will have a property answer with the value of 42.
Another widely popular feature about object literals is available to you when you need to define an object with property names to hold values that exist in the current scope with the exact same names. You can use the shorthand property name syntax for that. That’s what we did for the InverseOfPI variable above. That part of the object is equivalent to:
const obj = {
  InverseOfPI: InverseOfPI,
};
Objects are very popular in JavaScript. They are used to manage and communicate data and using their modern literal features will make your code a bit shorter and easier to read.
Promises and async/await
When you need to work with asynchronous operations, you usually have to deal with promise objects. A promise is an object that might deliver data at a later point in the program, or it might crash and deliver an error instead.
An example of an async function that returns a promise is the Web fetch API that’s natively available in some browsers.
const fetchData = () => {
  fetch('https://api.github.com').then(resp => {
    resp.json().then(data => {
      console.log(data);
    });
  });
};
The fetchData function fetches information from the top-level GitHub API. Since fetch returns a promise, to consume that promise we do a .then call on the result of fetch and supply a callback function in there. The callback function will receive the raw response from the API. If you need to parse the data as JSON, you need to call the json() method on the raw response object. That json() method is also an asynchronous one, so it returns a promise as well. To get to the data, you need another .then call on the result of the json() method and in the callback of that you can access the parsed data.
As you can see, this syntax might get complicated with more nesting of asynchronous operations or when you need to combine this with any looping logic. You can simplify the nesting above by making each promise callback return the promise object, but the whole .then syntax is a bit less readable than the modern way to consume promises in JavaScript which is using async/await:
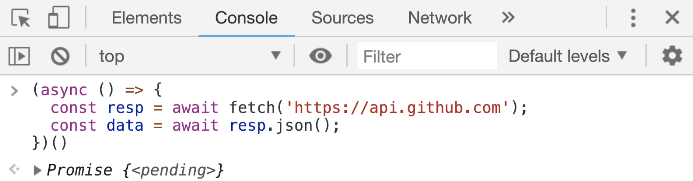
const fetchData = async () => {
  const resp = await fetch('https://api.github.com');
  const data = await resp.json();
  console.log(data);
};
You just await on the async call (the one that returns a promise) and that will give you back the response object directly. Then, you can await on the json() method to access the parsed JSON data. To make await calls work, you just need to label the function as async.
The async/await syntax is just another way for you to consume promises (but without having to deal with .then calls). It’s a bit simpler to read but keep in mind that once you await on anything in a function that function itself becomes asynchronous and it will return a promise object (even if you don’t return anything from it).
For error-handling (when promises reject, for example) you can combine the async/await syntax with the plain-old try/catch statement (and you should do that all the time).
Modules import/export
Modern JavaScript introduced the import/export statements to provide a solution for "module dependency management", which is just a fancy term to describe JavaScript files that need each other.
A file X.js that needs to use a function from file Y.js can use the import statement to declare this dependency. The function in Y.js has to be exported first in order for any other files to import it. For that, you can use the export keyword:
export const functionY() {

}
Now any file can import this named functionY export. If X.js is on the same directory as Y.js, you can do:
import { functionY } from './Y';

// functionY();
The { functionY } syntax is not destructuring! It’s importing of a named export. You can also export without names using this other syntax:
export default function () {

}
When you import this default Y export, you can give it any name you want:
import function42 from './Y';

// function42();
| While default exports have their advantages, named exports play much better with intelligent IDEs that offer autocomplete/discoverability and other features. It is usually better to use named exports especially when you’re exporting many items in a module. |
Map, filter, and reduce
These 3 array methods replace the need to use for/while loops in many cases. The value of using them over for/while loops is that they all return a value. They are expressions. They can be embedded right into JSX curly brackets.
All of these methods work on an original array and receive a callback function as an argument. They invoke the callback function per item in the original array and do something with that callback’s return value. The best way to understand them is through examples.
Here’s an example of .map that squares all numbers in an array of numbers:
[4, 2, 0].map(e => e * e);

// Result: [16, 4, 0]
The map method uses the return values of its callback function to construct a new array. The return value for each callback function invocation becomes the new values in the new constructed (mapped) array.
Here’s an example of .filter that filters an array of numbers reducing it to the set of even numbers only:
[4, 7, 2, 5, 0, 11].filter(e => e%2 === 0)

// Result: [4, 2, 0]
The filter method uses the return values of its callback function to determine if the current item should remain in the new constructed (filtered) array. If the callback function returns true, the item remains.
Here’s an example of reduce that will compute the sum of all numbers in an array:
[16, 4, 0].reduce((acc, curr) => acc + curr, 0);

// Result: 20
The reduce method uses a slightly different callback function. This one receives 2 arguments instead of one. Besides the regular current-item element (named e in all examples), this one also receive an accumulator value (named acc in the example). The initial value of acc is the second argument of reduce (0 in the example).
The return value for each callback function invocation becomes the new value for the acc variable.
Here’s what happens to reduce [16, 4, 0] into 20:
Initial value of acc = 0

First run: acc = 0, curr = 16
  New acc = 0 + 16 = 16

Second run: acc = 16, curr = 4
  New acc = 16 + 4 = 20

Third run: acc = 20, curr = 0
  New acc = 20 + 0 = 20

Final value of acc = 20
Because all of these functions are expressions that return values, we can chain them together:
[4, 7, 2, 5, 0, 11]
  .filter(e => e%2 === 0)
  .map(e => e * e)
  .reduce((acc, curr) => acc + curr, 0);

// Result: 20
This chain will take an array of numbers and compute the sum of the even numbers in that array after they are squared. You might think that doing 3 loops instead of 1 (which would manually include all the operations) is an overkill but this functional style has many advantages.
Conditional expressions
Because you can only include expressions within the JSX curly brackets, you can’t write an if statement in them. You can, however, use a ternary expression:
<div>
  {condition ? valueX : valueY}
</div>
JSX will output either valueX or valueY based on condition. The values can be anything, including other UI elements rendered with JSX:
<div>
  {condition ? <input /> : <img />}
</div>
If the result of evaluating an expression inside JSX curly brackets is true or false (including undefined and null), React will completely ignore that expression. It will not be casted as strings: "true"/"false"/"null"/"undefined".
This div will have no content at all:
<div>
  {3 === 3}
</div>
This is intentional. It allows using a shorter syntax to put a value (or element) behind a condition by using the && operator:
<div>
  {condition && <input />}
</div>
If condition is true, the second operand will be returned. If it’s false React will ignore it. This means it will either render an input element or nothing at all. This JavaScript trick is known as the "short-circuit evaluation".
Timeouts and intervals
Timeouts and intervals are part of a browser’s API. They’re not really part of the JavaScript language itself but they’re used with JavaScript functions like setTimeout and setInterval.
Both of these functions receive a "callback" function and a "delay" value. setTimeout will invoke its callback function one time after its delay value while setInterval will repeatedly invoke its callback function with its delay value between each invocation.
This code will print the "Hello Timeout!" message after 3 seconds:
setTimeout(() => {
  console.log('Hello Timeout!');
}, 3000);
The first argument is the callback function and the second is the delay (in milliseconds). The code in the callback function (the bolded part) is the code that will be executed after 3 seconds.
This code will print the "Hello Interval!" message each 3 seconds, forever:
setInterval(() => {
  console.log('Hello Interval!');
}, 3000);
A setInterval call will usually have an "exit" condition. Both setTimeout and setInterval return an "id" of the timer object they create and that id value can be used to stop them. You can use a clearTimeout(id) call to stop a timeout object and clearInterval(id) to stop an interval object.
This code will print the "Hello Interval!" message each 3 seconds but only for 3 times:
let count = 0;
const intervalId = setInterval(() => {
  count = count + 1
  console.log('Hello Interval!');
  if (count === 3) {
    clearInterval(intervalId);
  }
}, 3000);
Timers in a React application are usually introduced within a "side effect" hook function.