Yes, React is taking over front-end development. The question is why.
| The focus of this article is about React’s popularity and not how it compares to other frameworks or libraries |
Here are a few reasons why React has become so popular so quickly:
-
Working with the DOM API is hard. React basically gives developers the ability to work with a virtual browser that is friendlier than the real browser.
-
React is just JavaScript. There is a very small API to learn, and after that your JavaScript skills are what make you a better React developer. There are no barriers to entry.
-
Learning React pays off big-time for iOS and Android mobile applications as well. React Native allows you to use your React skills to build native mobile applications. You can even share some logic between your web, iOS, and Android applications.
-
The React team at Facebook tests all improvements and new features that get introduced to React right there on facebook.com, which increases the trust in the library among the community. It’s rare to see big and serious bugs in React releases because they only get released after thorough production testing at Facebook.
-
Most importantly, React enables developers to declaratively describe their User Interfaces and model the state of those interfaces. This means instead of coming up with steps to describe transactions on interfaces, developers just describe the interfaces in terms of a final state (like a function). When transactions happen to that state, React takes care of updating the User Interfaces based on that.
But there’s a lot more to it than just that. Let’s attempt to cover all the reasons behind React’s rising popularity. One reason is its Virtual DOM (React’s reconciliation algorithm). We’ll work through an example to show the actual practical value of having such an algorithm at your command.
React’s official definition states that it’s a JavaScript library for building User Interfaces. It’s important to understand the two different parts of this definition:
-
React is a JavaScript library. It is not a framework. It is not a complete solution and we will often need to use more libraries with React to form any solution. React does not assume anything about the other parts in any solution. It focuses on just one thing and on doing that thing very well.
-
The thing that React does very well is the second part of the definition: building User Interfaces. A User Interface is anything we put in front of users to have them interact with a machine. User Interfaces are everywhere, from the simple buttons on a microwave to the dashboard of a space shuttle. If the device we are trying to interface can understand JavaScript, we can use React to describe a User Interface for it.
Since Web browsers understand JavaScript, we can use React to describe Web User Interfaces. I like to use the word describe here because that is what we basically do with React. We just tell React what we want, and it will build the actual User Interfaces, on our behalf, in the Web browser. Without React or similar libraries, we would need to manually build User Interfaces with native Web APIs and JavaScript and that is not as easy.
When you hear the statement that "React is declarative," this is exactly what it means: we describe User Interfaces with React and tell it what we want (not how to do it). React will take care of the "how" and translate our declarative descriptions (which we write in the React language) to actual User Interfaces in the browser. React shares this simple declarative power with HTML itself, but with React we get to be declarative for HTML interfaces that represent dynamic data, not just static data.
How exactly is not being a framework a good thing?
I love big frameworks (and I cannot lie). Frameworks serve a great purpose, especially for young teams and startups. When working with a framework, many smart design decisions are already made for you, which gives you a clear path to focus on writing good application-level logic.
However, frameworks come with some disadvantages as well. For experienced developers working on large codebases, these disadvantages are sometimes a deal breaker. Let me name two of the important disadvantages about using a framework:
-
Frameworks are not flexible, although some claim to be. Frameworks want you to code everything a certain way; if you try to deviate from that way, the framework usually ends up fighting you about it.
-
Frameworks are large and full of features. If you need to use only a small piece of them, you have to include the whole thing anyway.
Admittedly, the latter point is changing today but it is still not ideal. Some frameworks are going modular, which I think is great, but I am a big fan of the pure Unix philosophy:
Write programs that do one thing and do it well. Write programs to work together. Write programs to handle text streams, because that is a universal interface.
React follows the Unix philosophy because it is a small library that focuses on just one thing. What React does exceptionally well is creating a common language between developers and browsers that allows developers to declaratively describe user interfaces and model the state of these interfaces instead of managing UI transactions on them.
If someone asked you to give ONE reason why React is worth learning, this is the one.
React has 3 main technical design concepts that drive its popularity:
1 – Reusable, composable, and stateful components
In React, we describe User Interfaces using components. You can think of components as simple functions (in any programming language). We call functions with some input and they give us some output. We can reuse functions as needed and compose bigger functions from smaller ones.
Components are exactly the same; we call their input "properties" and "state" and a component output is a description of a User Interface. We can reuse a single component in multiple User Interfaces and components can contain other components.
However, unlike pure functions, a class-based React component can have a private state to hold data that may change over the lifecycle of the component.
2 – Reactive Updates
React’s name is the simple explanation for this concept. When the state of a React component (the input) changes, the User Interface it represents (the output) changes as well. This change in the description of the User Interface has to be reflected in the device we are working with.
In a browser, we need to regenerate the HTML views in the DOM. With React, we don’t need to worry about how to reflect these changes or even manage when to take changes to the browser; React will simply react to the state changes and automatically update the DOM when needed.
3 – The Virtual Representation of Views in Memory
With React, we write HTML using JavaScript. We rely on the power of JavaScript to generate HTML that depends on some data rather than enhancing HTML to make it work with that data. Enhancing HTML is what other JavaScript frameworks usually do. For example, Angular extends HTML with features like loops, conditionals, and others.
When we receive just the data from the server (in the background, with AJAX), we need something more than HTML to work with that data. It is either using an enhanced HTML to be parsed by JavaScript or using the power of JavaScript itself to generate the HTML. Both approaches have advantages and disadvantages. React embraces the latter one.
There is one major advantage that can make the case for React’s approach by itself; using JavaScript to render HTML makes it easy for React to keep a virtual representation of HTML in memory (which is commonly known as The Virtual DOM). React uses the Virtual DOM to render an HTML tree virtually first, and then every time a state changes and we get a new HTML tree that needs to be taken to the browser’s DOM, instead of writing the whole new tree, React will only write the difference between the new tree and the previous tree (since React has both trees in memory). This process is known as Tree Reconciliation.
In the following example, we will focus on this last concept and see a simple practical example of the tree reconciliation process and the big difference it makes. We will write the same HTML example twice, first using native Web APIs and vanilla JavaScript, and then we will see how to describe the same HTML tree with React.
To purely focus on this last concept, we will not be using components and we will mock a state change operation using a JavaScript timer. We are also not going to use JSX, although using JSX will make for a much simpler code. I use JSX all the time when I write React but working with the React API directly in this example will hopefully make you understand this concept much better.
Example of React’s Reconciliation Algorithm
To follow along with this example, you need a browser and a code editor. You can actually use an online coding playground, but I will use local files and test them directly in a browser. We do not need a web server for this example.
Let’s start this example from scratch. Create a new directory and launch your favorite editor there:
mkdir react-demo
cd react-demo

atom .
Next, create an index.html file in that directory and put a standard HTML template in there. In that template, include a script.js file and put a console.log statement in that script to test that the include works:
<!DOCTYPE html>
<html>
  <head>
    <meta charset="utf-8">
    <title>React Demo</title>
  </head>

  <body>
    <script src="script.js"></script>
  </body>
</html>
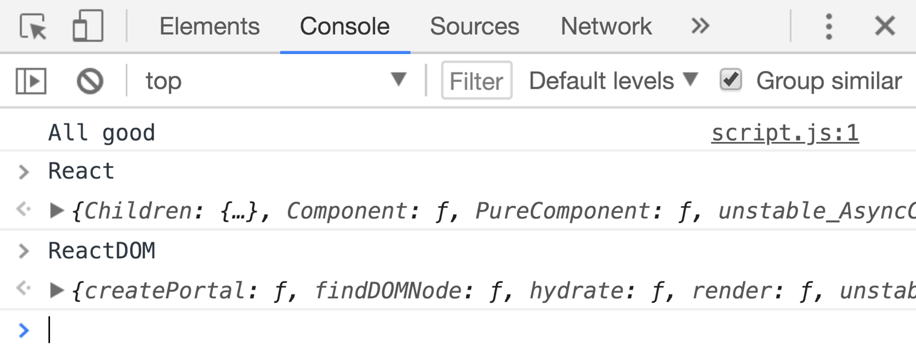
console.log('All good');
Open the index.html file in your browser, make sure you can see the empty template without problems, and that you can see in the DevTools console tab the console.log test message that you put in script.js:
open index.html # On Mac

explorer index.html # On Windows
Now, let’s bring in the React library itself, which we can include from the installation instructions at the React.js website. Copy both the react and react-dom scripts and include them in index.html:
<script crossorigin src="https://unpkg.com/react@16/umd/react.development.js"></script>

<script crossorigin src="https://unpkg.com/react-dom@16/umd/react-dom.development.js"></script>
Make sure to include these scripts above the local script.js include.
We are including two different scripts here for an important reason: The React library itself, which can be used without a browser. To use React with a browser (DOM), we need the ReactDOM library.
When we refresh the browser now, we should see both React and ReactDOM available on the global scope:
With this simple setup, we can now access both React and ReactDOM APIs, and of course we also have access to the native Web APIs and JavaScript which we are going to use first.
To insert HTML dynamically in the browser, we can simply use pure JavaScript and the DOM Web API itself. Let’s create a div element to host our JavaScript HTML content and give it the id "mountNode". In the body element of index.html, right before the script tag, add:
<div id="mountNode"></div>
Now in script.js, let’s grab this new div element by its id and put it in a constant. Let’s name this constant jsContainer. We can use document.getElementById to grab the div element reference:
const jsContainer = document.getElementById('mountNode');
To control the content of this div, we can use the innerHTML setter call on the div element directly. We can use this call to supply any HTML template that we want inserted in the DOM. Let’s insert a div element with a class of "demo" and the string "Hello JS" as its content:
jsContainer.innerHTML = `
  <div class="demo">
    Hello JS
  </div>
`;
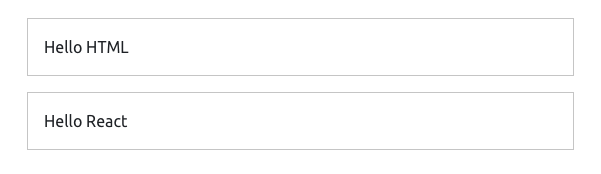
Make sure this works in the browser. You should see the "Hello JS" line on the screen when you refresh your browser now.
This demo div is our User Interface so far. It is a very simple one. We just output a text for the user to see.
Both document.getElementById and element.innerHTML are actually part of the native DOM Web API. We are communicating with the browser directly here using the supported APIs of the Web platform. However, when we write React code we use the React API instead and we let React communicate with the browser using the DOM Web API.
To create the exact same User Interface that we have so far but with React API this time, let’s create another div element and give it an id of "mountNode2". In index.html, right under the div#mountNode element, add:
<div id="mountNode2"></div>
Now, in script.js, create a new container constant for the new div:
const reactContainer = document.getElementById('mountNode2');
This container will be the only call we make to the native web API. ReactDOM needs this container to know where to host our application in the DOM.
With the react container identified, we can now use the ReactDOM library to render React’s version of the HTML template to this container:
ReactDOM.render(
  /* TODO: React's version of the HTML template */,
  reactContainer
);
The ReactDOM.render method is basically the entry point for a React application into the browser’s DOM. This is why we needed to use a DOM element with it.
|
What we are going to do next is your first milestone in truly understanding the React library. Remember when I told you that with React we write HTML using JavaScript? This is exactly what we are going to do next.
To write our simple HTML User Interface, we are going to use JavaScript calls to the React API and by the end of the example you will have a better picture about the reason for doing so.
Instead of working with strings (as we did in the native JavaScript example above), in React we work with objects. Any HTML string will be represented as an object using a React.createElement call (which is the core function in the React API).
Here is the equivalent HTML User Interface we have so far written with React:
ReactDOM.render(
  React.createElement(
    "div",
    { className: "demo" },
    "Hello React"
  ),
  reactContainer
);
The React.createElement function has many arguments:
-
The first argument is the HTML tag, which is div in our example.
-
The second argument is an object that represents any attributes we want this tag to have. To match the native JS example, we used
{ className: "demo" }, which translates toclass="demo". Note how we usedclassNameinstead ofclassin the attributes because with React it is all JavaScript that matches the Web API, not HTML. -
The third argument is the content of the element. We’ve put a "Hello React" string in there.
React.createElement can also be used to describe React components. More on this later.
|
We can test this now. The browser should render both "Hello JS" and "Hello React". Let’s style the demo divs as a box using this CSS, just so that we can visually split the screen:
// In index.html

<style media="screen">
  .demo {
    border: 1px solid #ccc;
    margin: 1em;
    padding: 1em;
  }
</style>
We now have two nodes, one being controlled with the DOM API directly and another being controlled with the React API (which in turn uses the DOM API). The only major difference between the ways we are building these two nodes in the browser is that in the JS version we used a string to represent the content, while in the React version we used pure JavaScript calls and represented the content with an object instead of a string.
No matter how complicated the HTML User Interface is going to get, when using React, every HTML element will be represented with a JavaScript object using a`React.createElement` call.
Let’s now add some more features to our simple User Interface. Let’s add a text box to read input from the user.
To nest elements in our HTML template, it is straight forward in the JS version because it is just HTML. For example, to make the demo div render an <input /> element, we simply add it to the content:
jsContainer.innerHTML = `
  <div class="demo">
    Hello JS
    <input />
  </div>
`;
We can do the same with React by adding more arguments after the third argument for React.createElement. To match what we did in the native JS example, we can add a fourth argument that is another React.createElement call that renders an input element:
ReactDOM.render(
  React.createElement(
    "div",
    { className: "demo" },
    "Hello React ",
    React.createElement("input")
  ),
  reactContainer
);
| At this point, if you are questioning what we are doing and thinking "this is complicating a simple process", you are totally right! But there is a very good reason for what we are doing. Keep reading. |
Let’s also render a timestamp in both versions. In the JS version, let’s put the timestamp in a paragraph element. We can use a call to new Date() to display a simple timestamp:
jsContainer.innerHTML = `
  <div class="demo">
    Hello JS
    <input />
    <p>${new Date()}</p>
  </div>
`;
To do the same in React, we add a fifth argument to the top-level div element. This new fifth argument is another React.createElement call, this time using a p tag, with no attributes, and the new Date() string for content:
ReactDOM.render(
  React.createElement(
    "div",
    { className: "demo" },
    "Hello React ",
    React.createElement("input"),
    React.createElement(
      "p",
      null,
      new Date().toString()
    )
  ),
  reactContainer
);
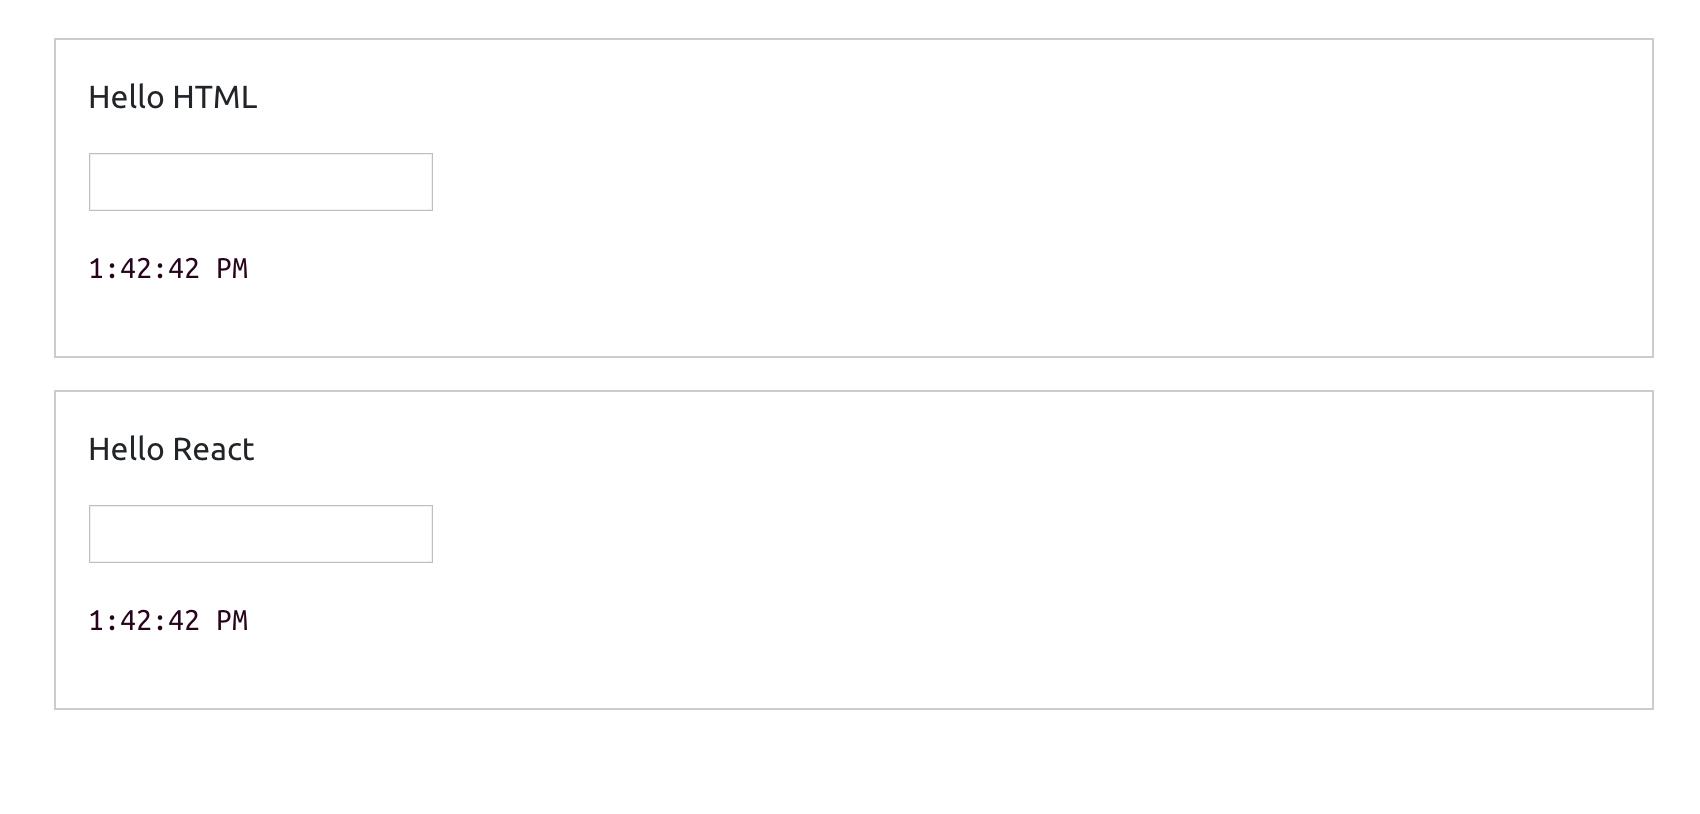
Both JS and React versions are still rendering the exact same HTML in the browser.
As you can see, so far, using React is actually a lot harder than the simple and familiar native way.
What is it that React does so well that is worth giving up the familiar HTML and having to learn a new API to write what can be simply written in HTML?
The answer is not about rendering the first HTML view. It is about what we need to do to update any existing view in the DOM.
So, let’s do an update operation on the DOM that we have so far. Let’s simply make the timestamp tick every second.
We can easily repeat a JavaScript function call in a browser using the setInterval Web timer API. So, let’s put all of our DOM manipulations for both JS and React versions into a function, name it render, and use it in a setInterval call to make it repeat every second.
Here is the full final code in script.js:
// React vs. DOM

const jsContainer = document.getElementById('mountNode');
const reactContainer = document.getElementById('mountNode2');

const render = () => {
  jsContainer.innerHTML = `
    <div class="demo">
      Hello JS
      <input />
      <p>${new Date()}</p>
    </div>
  `;
  ReactDOM.render(
    React.createElement(
      "div",
      { className: "demo" },
      "Hello React ",
      React.createElement("input"),
      React.createElement(
        "p",
        null,
        new Date().toString()
      )
    ),
    reactContainer
  );
};

setInterval(render, 1000);
When we refresh the browser now, the timestamp string should be ticking every second in both versions. We are now updating our User Interface in the DOM.
This is the moment when React will potentially blow your mind. If you try to type something in the text box of the JS version, you will not be able to. This is very much expected because we are basically throwing away the whole DOM node on every tick and regenerating it. However, if you try to type something in the text box that is rendered with React, you can certainly do so!
Although the whole React rendering code is within our ticking timer, React is changing only the timestamp paragraph and not the whole DOM node. This is why the text input box was not regenerated and we were able to type in it.
You can see the different ways we are updating the DOM visually if you inspect the two DOM nodes in a Chrome DevTools elements panel. The Chrome DevTools highlight any DOM elements that get updated. You will see how we are regenerating the entire jsContainer element with every tick, while React is smartly only regenerating the paragraph with the timestamp string in the reactContainer element.
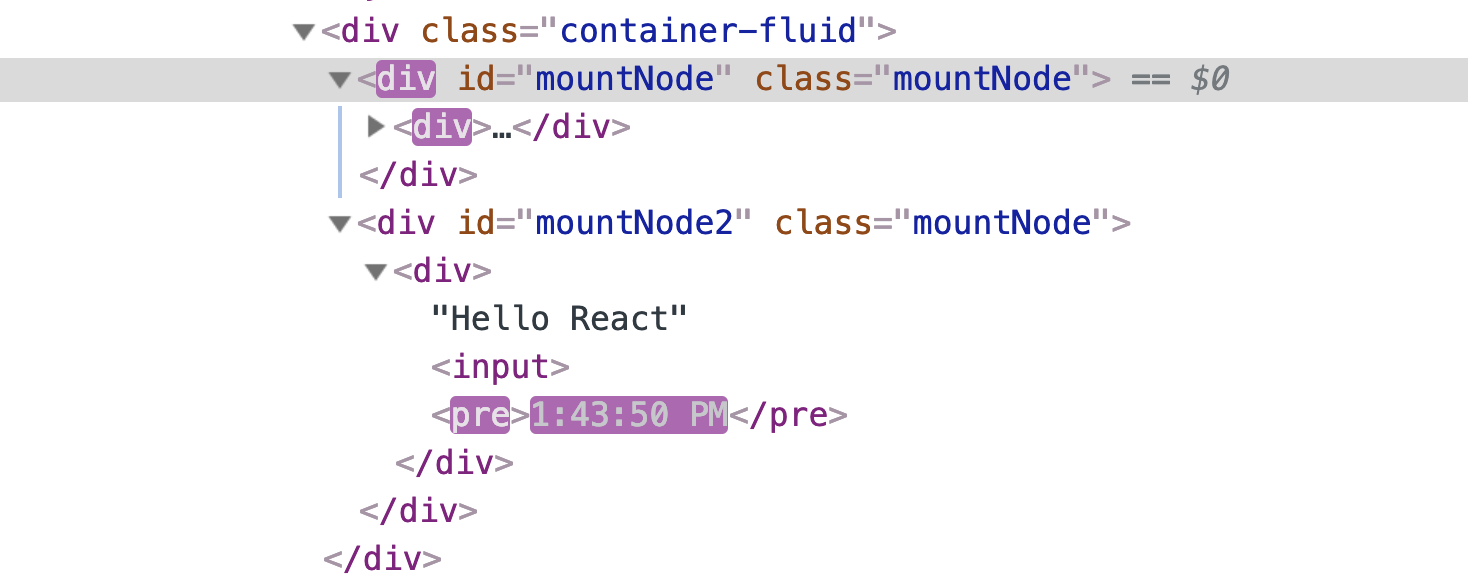
This is React’s smart diffing algorithm in action. It only regenerates in its DOM node what actually needs to be regenerated while it keeps everything else the same. This diffing process is possible because of React’s virtual DOM and the fact that we have a representation of our User Interface in memory (because we wrote in JavaScript).
Using the virtual DOM, React keeps the last DOM version in memory and when it has a new one to take to the browser, that new DOM version will also be in memory so React can compute the difference between the new and the old versions (in this example, the difference was the timestamp paragraph).
React will then instruct the browser to update only the computed diff and not the whole DOM node. No matter how many times we regenerate our interface, React will take to the browser only the new "partial" updates.
Not only is this method a lot more efficient, but it also removes a big layer of complexity about the way we think about updating User Interfaces. Having React do all the computations about whether we should or should not update the DOM enables us to focus on thinking about our data (state) and the way to describe a User Interface for it.
We then manage the updates on the data state as needed without worrying about the steps needed to reflect these updates in the actual User Interface in the browser (because we know React will do exactly that and it will do that in an efficient way!)